A Comprehensive Guide
In the constantly evolving technological world it is becoming increasingly important to be able to use a variety of operating systems on one computer has become more valuable. Mac users, specifically are often in situations that require them access to Windows-based apps or software. This is where you can use Parallels Desktop 18. It is a powerful tool for virtualisation which allows you to download and install Windows 11 on your Mac. In this detailed guide, we’ll take you thru the way to get this executed seamlessly, thereby developing your Mac a really effective machine.
Why Install Windows 11 on Your Mac?
Before we get too caught up in the details of installing Windows 11, let’s briefly discuss why running the OS might make sense for Mac users. There are multiple compelling arguments supporting installing and using it as there are so many benefits associated with doing so:
1-Access to Windows-Exclusive Software
Windows offers a vast collection of software, many of which do not include Mac equivalents. If you install Windows from your Mac it is possible to benefit from this massive collection of software, which includes games, productivity tools, and software that is tailored to your industry.
2. Compatibility Testing
Builders and IT specialists checking out websites and software program on various platforms is critical. Through Parallels Desktop 18, you are able to easily toggle from macOS or Windows environments, speeding up your testing procedure.
3. Seamless Cross-Platform Workflows
The ability to run Windows in conjunction with your Mac will ensure a seamless transition between your professional and personal tasks. When you’re required to utilise Windows-specific applications for business or create macOS-exclusive artistic projects, having two operating systems available can be a game changer.Once we’ve established importance of this task Let’s move on to the step-by-step guide for installing Windows 11 on your Mac by using Parallels Desktop 18
Step 1: Prepare Your Mac
Necessary Requirements
- A Mac computer with an Intel Core i5 or higher processor.
- A minimum of 8 GB of RAM (16 GB or more is recommended).
- At least 128 GB of free storage space on your Mac.
- A copy of Windows 11 in ISO format.
- A valid Windows 11 product key.
Download Parallels Desktop 18
To get began begin by means of downloading and installing Parallels desktop 18 from the authentic Parallels website. You must are in possession of a valid licence for the program.
Step 2: Create a Virtual Machine
Launch Parallels Desktop 18
After you’ve installed Parallels Desktop 18, launch the program.
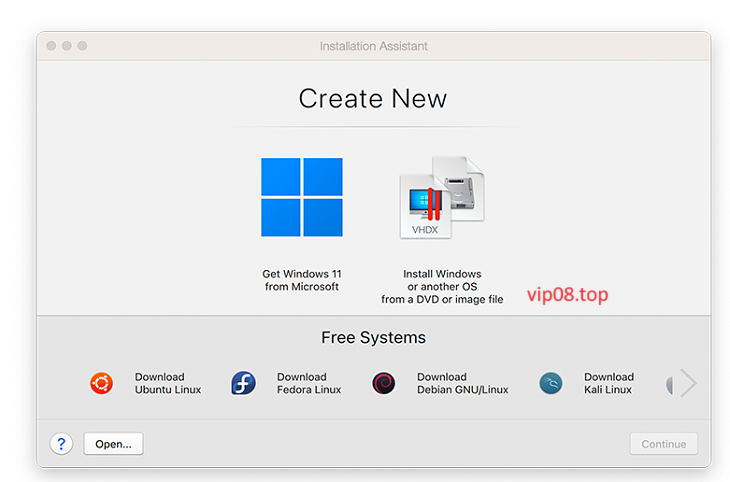
Click “New” to Create a New Virtual Machine
Within the Parallels Desktop interface, click the “New” button to initiate the process of setting up Your virtual machine.
Select “Install Windows or another OS from a DVD or image file” option
Select this option since you’ll install Windows 11 from an ISO file.
Locate the Windows 11 ISO File
Choose “Browse” and navigate to the location you’ve saved Windows 11 ISO files. Windows 11 ISO file. Select it and continue.
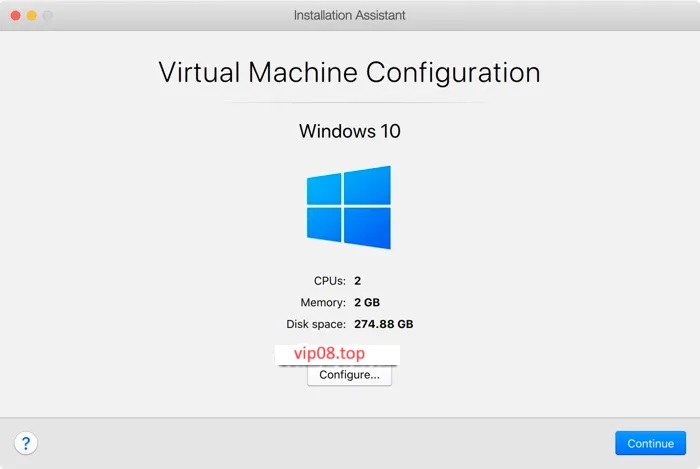
Configure VM Settings
Parallels Desktop will detect automatically your Windows OS and optimize the settings. However, you can alter them to fit your personal preferences in terms of the amount of CPU cores and RAM allotted for the Virtual Machine.
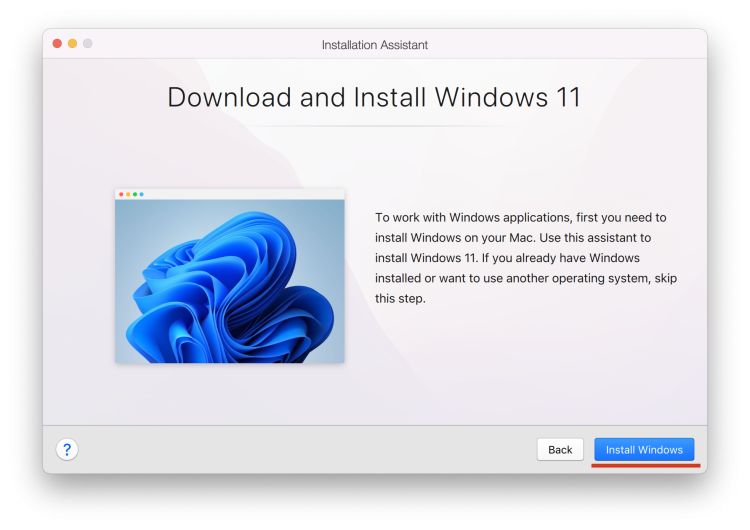
Install Windows 11
After you have the settings set after which you after setting the settings, click “Continue” and follow the instructions on screen in order to download Windows 11. Then, you’ll be asked to enter your key code when you install.
Step 3: Install Parallels Tools
When Windows 11 is installed, you’ll be required for you to download Parallels Tools for seamless integration between both operating systems. This includes features like a shared clipboards as well as drag-and-drop features.
Click “Actions” and Select “Install Parallels Tools”
On the Parallels Desktop menu, click “Actions” and select “Install Parallels Tools.” This will install an ISO of the Parallels Tools ISO in Windows.
Follow the Installation Wizard
In the Windows environment Open your mounted ISO file, and then run the wizard for installation. Follow the instructions on screen to finish the installation.
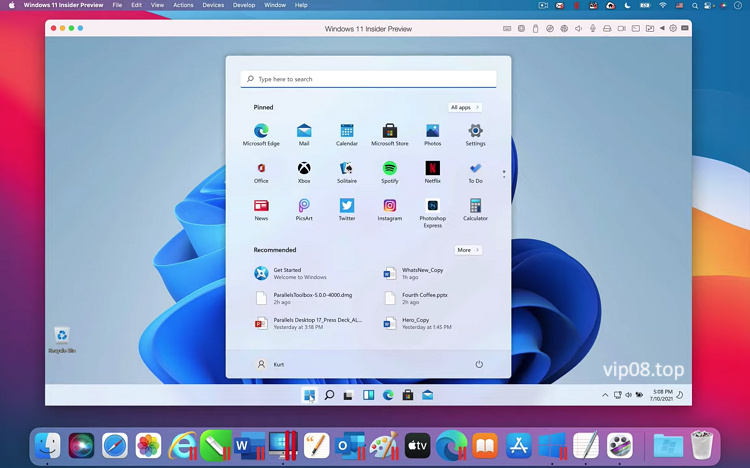
Step 4: Enjoy Windows 11 on Your Mac
Congratulations! It’s done! Windows 11 on your Mac with the help of Parallels Desktop 18. You’re now able to change from macOS and Windows effortlessly, and enjoy the benefits of both. When you require Windows-only apps or you want to discover your options within the Windows 11 ecosystem Your Mac can now manage everything.
Advanced Configuration and Tips
Now that you have got window 11 up and running on your Mac Lets dive into some of the most advanced configurations and tricks to make your experience more enjoyable.
- Management of Multiple Virtual Machines:
If you intend to utilise Parallels Desktop for a variety of uses, such as running different Windows version or Linux the management of multiple virtual machine is crucial. They can be organized inside the Parallels interface which makes it simple to switch between various virtual environments. - Parallels Desktop Updates
Keeping your Parallels Desktop software current is crucial for accessing the latest features, and also to ensure compatibility with current macOS as well as Windows updates.Always check for updates within the Parallels application, and then install them in order to remain current and experience the highest functionality and performance. - Virtualisation of gaming
Parallels Desktop can be designed to play games which allows you gamers to experience Windows Games on your Mac. You can change the settings for graphics in your virtual machine to make sure your Mac is compatible with the game’s system specifications. By enabling this configuration you will be able to play your most loved Windows games with your Mac.
1. Allocate Sufficient Resources
Based on your use You may need to allocate more resources for Your virtual machine. Within Parallels Desktop, you can easily alter how much RAM, cores of processor and graphics memory that is assigned for Windows 11. This will extensively improve overall performance, mainly when running useful resource in depth packages.
2. Seamless Integration
Parallels Desktop has seamless integration features that let you effortlessly switch across macOS as well as Windows. Explore options like Coherence Mode that allows Windows applications run within the macOS desktop, as well as the capability to share folders and files between the two operating systems.
- Exploring Coherence Mode
Coherence Mode is a great feature in Parallels Desktop that allows you to run Windows applications along with macOS applications. It allows multitasking to be seamless like if the two operating systems were working in tandem. It’s possible to launch Windows applications directly from your macOS desktop and streamline your workflow. - Using Windows Applications On macOS
Parallels Desktop lets you launch Windows apps on the macOS desktop without opening the entire Windows environment. Simply click on an Windows application, and it will show up and operate as an native macOS application. This makes the use of Windows applications on your Mac extremely convenient.
3. Snapshots and Backups
Prior to making major modifications or upgrades on the Windows 11 installation, consider taking snapshots. Snapshots function as copies of the virtual machines at a certain moment in time. They are a lifesaver when something goes wrong in the course of an update or installation.
4. Windows Security
Make sure that Windows 11 installation is secure. Install an antivirus program, activate Windows Firewall, which is built into Windows Firewall and frequently upgrade Windows to safeguard your computer from security threats and malware.
5. Explore Parallels Toolbox
Parallels Toolbox is a suite of applications that will improve you Windows 11 experience on a Mac. It comes with tools to record your screen as well as taking screenshots and cleaning the storage of your virtual machine.
6. Enhancing Windows 11 Performance
After installing Windows 11 on your Mac it is important to optimize performance. It is possible to speed up the process by assigning more CPU and RAM in Windows 11 within Parallels Desktop settings. Also, making sure your virtual machine free of clutter by removing any unnecessary applications and data can make to run more smoothly.
7. Backup the Data on Your Virtual Machine
Backing up your Windows 11 virtual machine is similar to creating a safety net. Your information is secure. With Parallels Desktop, you can create snapshots that are similar to instant copies of the virtual machines. If something goes wrong or you make a mistake you are able to easily restore the previous snapshot.
Conclusion
In this complete guide we have delved into the benefits of installing windows 11 on your Mac and have provided a step by step guide for installing it with Parallels Desktop 18. Following these steps and you’ll be able to tap into every potential that is available to your Mac and turn it into an ideal tool to use for play work and everything between. No matter if you are a developer or someone who likes to be flexible using windows 11 on your Mac can open up a whole new world of possibilities. So, take a leap go for it and unleash the true capabilities of the Mac today.